Security. Arguably one of the most important components of your application, especially if you have to deal with private information and want to restrict access to only authorised parties. It’s wise to start planning for this ahead of time, to make sure you have a plan when you start implementing security features, because adding them as an afterthought is going to be troublesome.
What we will be covering
I am going to take you along with my journey where I secure a Spring application using OAuth 2.0 token based authentication. OAuth 2.0 is a global standard for securing applications, and as a result there is wide support from many vendors. While the approach differs from provider to provider (some offer it as a service, others as an application you can run inside your organisation), the core protocol remains the same. OAuth 2.0 also supports a wide variety of authentication scenarios that you can choose from to end up with a solution that best fits your application and infrastructure requirements.
We will be using the following components:
- Keycloak server
- Maven
- Kotlin/Spring Boot application
- Spring Security
- Testcontainers
In this post we will be setting up Keycloak as an authority and configure it so it can authenticate our users, allow them to retrieve access tokens and call a token secured back-end application.
OAuth 2.0 Token based authorization
Let’s take a look at an example flow for token based authorization. This is a simplified example where we assume that we have an authority set up to request a token from and then use this token to access a resource.
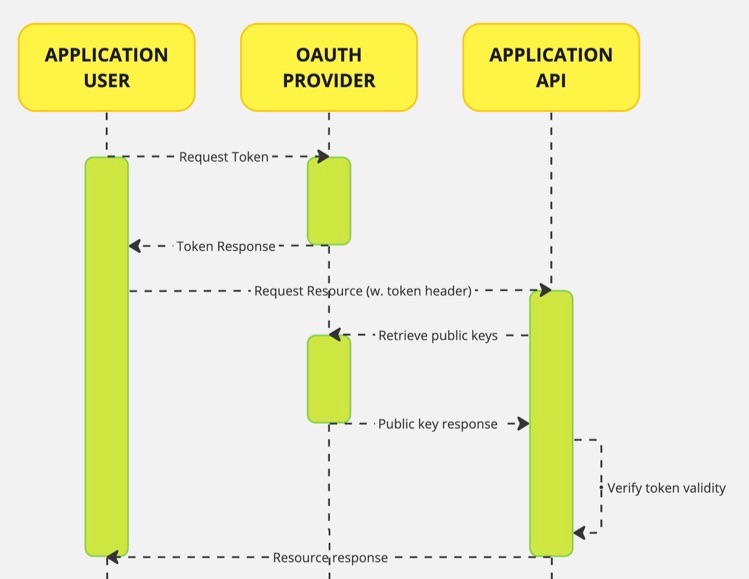
As is shown in the diagram, an application user requests a token from the Oauth provider. There are several ways to do this which are in the OAuth specification, we will be using the resource owner password flow for this example since it is simple to use and does not require apps to redirect to. In our case, we will have a user request a token directly from our OAuth provider.
If all information is provided correctly, a token response is returned from the authority which the user can retrieve an access token. Next, that user can call the API providing the token in the Authorization header. The server application retrieves the public keys from the authority in order to verify the signature of the provided token, and to check if it originated from a source we trust. Once the token is deemed valid, the request will be handled by the application in order to return a response to the user.
What’s nice about this approach is that we can delegate authentication to a trusted party in our landscape, not having to custom implement security ourselves. We can use the resulting token to contain any identifying information we need in our application. We will also be adding authorities inside the token that we can evaluate for resource access. We can trust the token that is provided to us by the calling user since we can verify its origin, if it is tamper-free by checking the signature and then use the enclosed information in the server. The backend just knows about the token and its origin and the rest can be handled transparently.
An important note on using password grant
Important to note here is that password grant is not recommended for use cases where all applications interacting are not under your control. Say you want your API to be consumed by third-party front-ends and such, then you should use the safer authorization code flow. The main reason for this is that you generally do not want users to share their username and password with untrusted external parties. In our case, we will have an API user authorise itself by making a call to the authority directly without any credentials being shared between other applications. In the OAuth 2.1 specification the password grant has been removed completely. Since we do not have a webapp in this example and are unable to use any of the redirect-based flows, we can still demonstrate how everything works using this grant. In a future post we will look into using recommended flows for applications that do not have the issues that password grant has.
The server-side implementation should not change based on how the token was retrieved by the user.
Picking an OAuth provider
Since there are many providers to choose from, this can be a difficult taks. In some cases your organisation already moved to a cloud provider and they generally support OAuth flows and can be used as an authority. Microsoft, Apple and Google all support flows like these and allow you to latch on to the accounts you already use; but it is also possible to pick a stand-alone solution such as Keycloak which is a standalone (open source) identity and access management application that you can deploy in your infrastructure and use as such. Keycloak has grown to be a popular choice for scenarios like ours, so this is the application we will be going with. What’s even better, we can test against Keycloak using it in a Docker image (using Testcontainers) to spin an environment up for local testing whenever we want to.
Keycloak supports the full spectrum of OAuth2 and in addition is OpenID Connect (OIDC) certified, making it a good choice if we would like to change the flow(s) we are using and/or use more advanced features that are included in OpenID Connect. The difference between the OIDC and OAuth 2.0 is that OAuth 2.0 provides authorization, while OIDC provides authentication. OAuth 2.0 is what allows users to gain access to a relying party, using their account with an OpenID provider, and OIDC is what allows the OpenID provider to pass along a user profile to the relying party. OIDC also allows organisations to offer their users single sign-on.
A word on Testcontainers
If you are serious about testing (and let’s face it, we probably all should be) you can’t go wrong using Testcontainers. It integrates well in many development scenarios and is supported by many frameworks, including Spring.
Setting up Keycloak
Since we would like Keycloak to do the heavy lifting, we will start by setting up Keycloak. We will configure our realm and and set up a client app for which we would like users to authenticate themselves. We will also add some test users, groups and roles that will be included in the resulting tokens for the server application to inspect and use. The roles we create will be treated as authorities in the final application, more on this in part 2.
Roles? Authorities?
In security, roles organize users into categories like “admin” or “user” and define their responsibilities and permissions, providing a broad level of access control. Authorities, on the other hand, grant specific rights or privileges for performing particular actions or accessing resources, offering finer-grained control. While roles offer a higher-level abstraction, authorities provide more precise control over tasks or data. Though roles and authorities serve different functions, together they form the foundation of effective access control in security systems.
Spring security treats roles as a subset of authorities; the roles are part of the full list of authorities a user has assigned. Using the available API, users can check for a role using
hasRole(<str>)and for an authority usinghasAuthority(<str>). By convention, Spring treats any authority that is prefixed withROLE_as a traditional role. Despite the distinction between roles and authorities, in Spring they are treated synonymously, leaving it up to the user to deal with them. In this example, we will be treating roles as authorities. In addition, the reasoning behind this decision will also be made clear.
Starting Keycloak
We will start up an instance of Keycloak, configure everything, then export the configuration so we can easily reimport it. This makes resetting the environment for our tests to a known state very easy. For production on the other hand you’ll likely have persistent configuration, but you could import the export as well to start off.
We already mentioned we would be using Testcontainers, so we will start using the framework and start the container with it.
Next, we can start the Testcontainer.
Once running, you should be able to log into the application by opening a browser to http://localhost:8081/admin/master/console/ . Log in using the provided username and password as configured in the code to start up the instance.
Creating a realm
The first thing we need to do, is create a realm. It’s at the root of the configuration we can provide in Keycloak. We can consider our organisation a realm on its own, so we will create a realm called ‘Sourcelabs’.
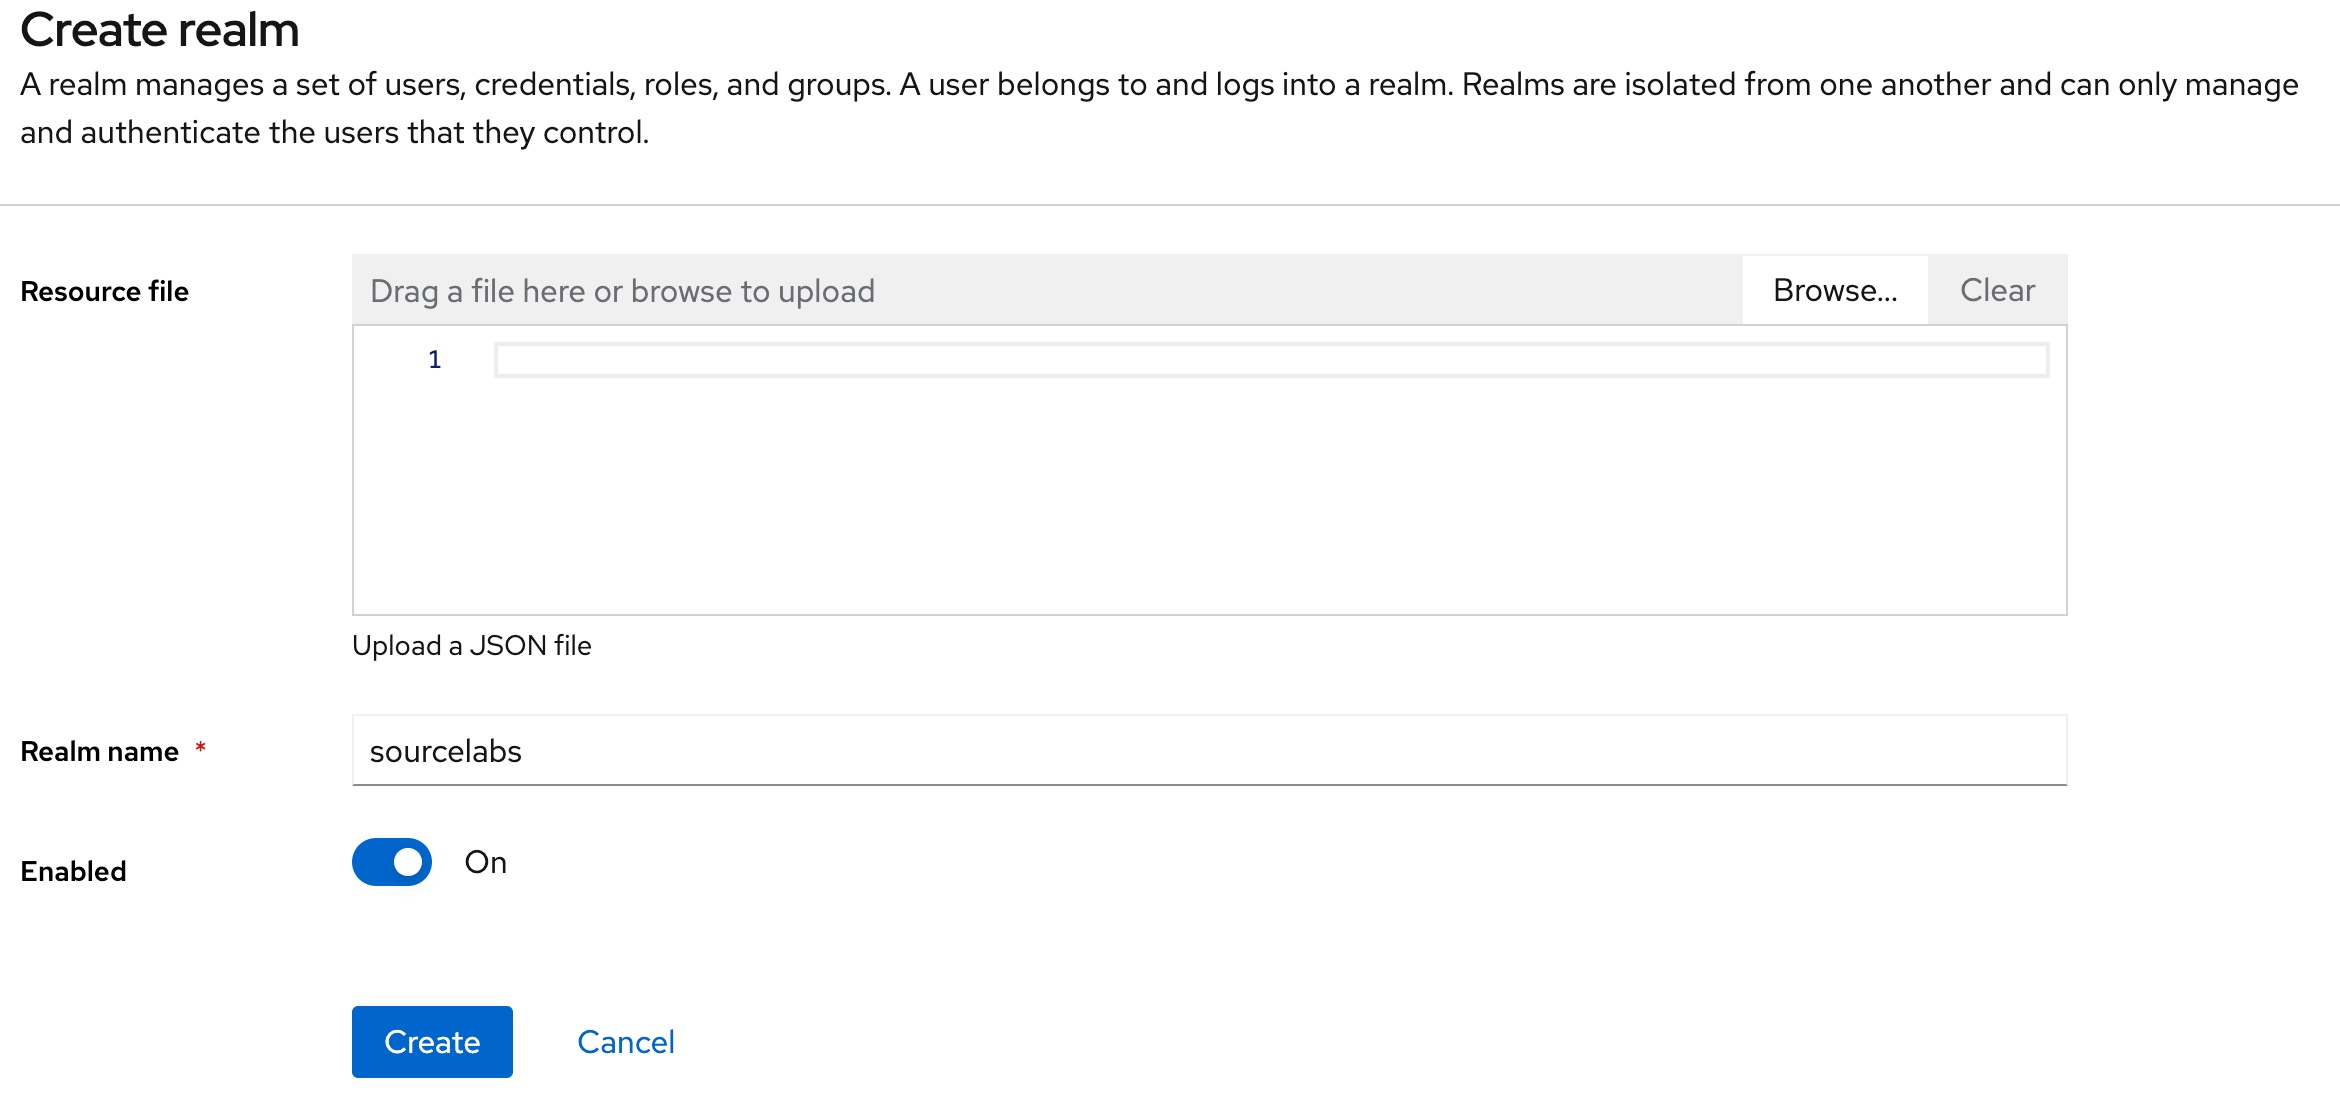
What’s a realm?
In security, especially in OAuth, a realm is like a gated area where access is granted or authenticated. It defines the specific domain or scope for which permissions or credentials are valid.
Creating an application client
Once created, the UI will automatically select the newly created realm. We can now set up an application client, by navigating to ‘clients’ and pressing the ‘create’ button on the view that opens. We will need to enter an id for the client, let’s call it ‘sourcelabs-app’, since this is the application that will use this client for authentication purposes. This ID is required since it is a unique identifier that needs to be provided when creating a token, this will ensure the token is compatible with the application the user is trying to access.
What is an application client?
An application client in OAuth is a software component (like a web or mobile app) that requests access to a user’s data from a server. It’s the application the user is authenticating for.
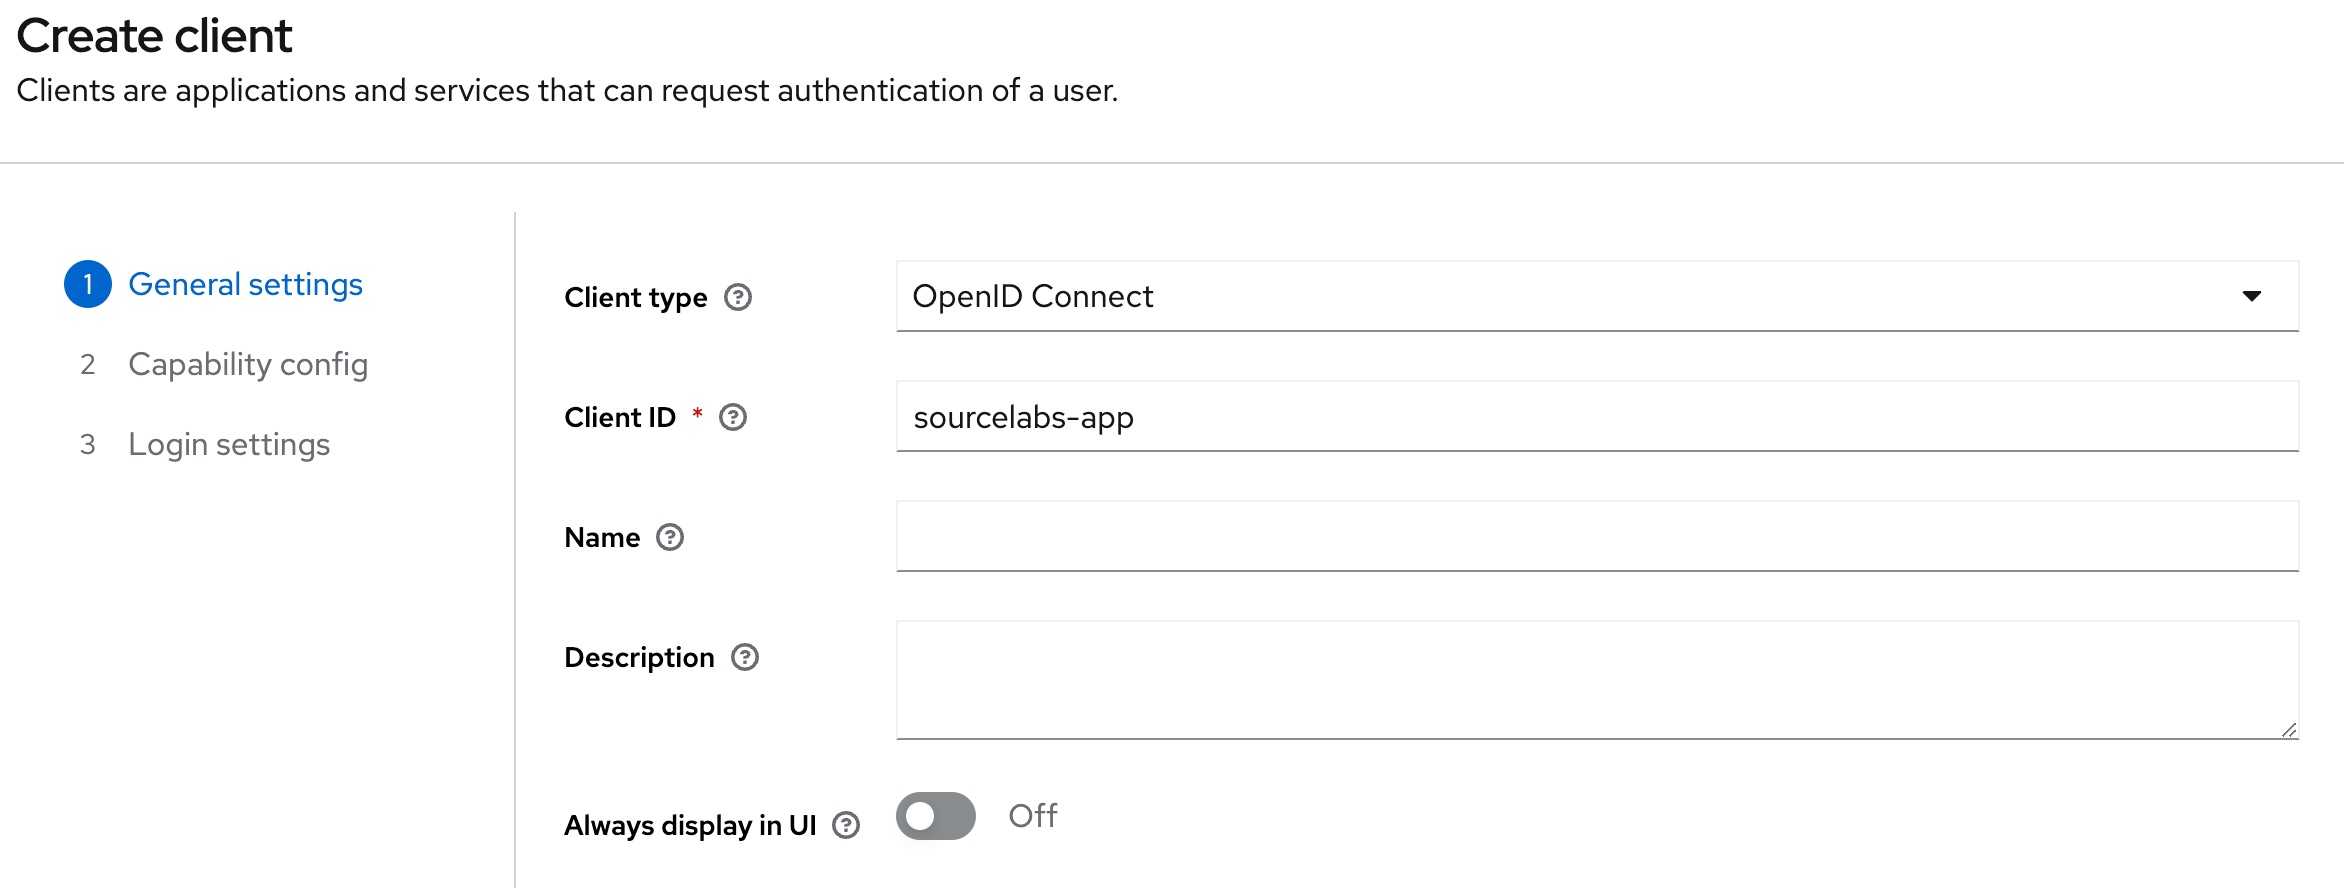
Press next after filling in the ID, we don’t need any additional configuration for this demo. Next up is configuring the capabilities. I am not enabling client authentication in this example, but it is recommended to enable it for production scenario’s so you application can authenticate itself when interacting with Keycloak. Client authentication makes sense when you build an application that interacts with keycloak on behalf of a user, for instance by providing a login form. To prevent users from creating tokens directly you can provide a clientId (sourcelabs-app) and a clientSecret (a generated password) which you will then need to provide when acquiring a token. The client credentials are a form of authentication between applications.
Leave the settings as default, as they are sufficient for now. Press ‘next’. We can now configure login settings in case we need to, but for this demo we can leave everything on default. You can configure valid web origins and relevant URIs here, if needed for your application, but since we won’t be building a front-end that interacts with Keycloak, we do not need to configure any of this. Keep all the defaults and click ‘Save’.
Creating application roles
Once created, the UI will redirect you to the details of your application client. Navigate to the ‘ROLES’ tab for the client, and press ‘Create role’. Create two roles: ‘USER’ and ‘ADMIN’. The roles we create here will have meaning in our application and will dictate the level of access a user has. When assigned to a user, Keycloak will add them to the access token.

You can assign roles directly to users, or assign them to groups and add users to them, we will use the latter. Using groups makes sense since it will make it easier to create new users and assign them to a group, automatically granting them the roles they need to do whatever they need to do in the application. Assigning roles directly to users makes this a manual task which is error-prone.
Let’s create the groups: a group of ‘USERS’ and a group of ‘ADMINS’. In the menu on the left, navigate to ‘Groups’. Press the ‘Create group’ button and create the groups.
Once created, we will add role mappings to both groups. Click on the ‘USERS’ group and navigate to the ‘Role mapping’ tab. Click ‘Assign role’ and search for ‘USER’ in the view that opens.
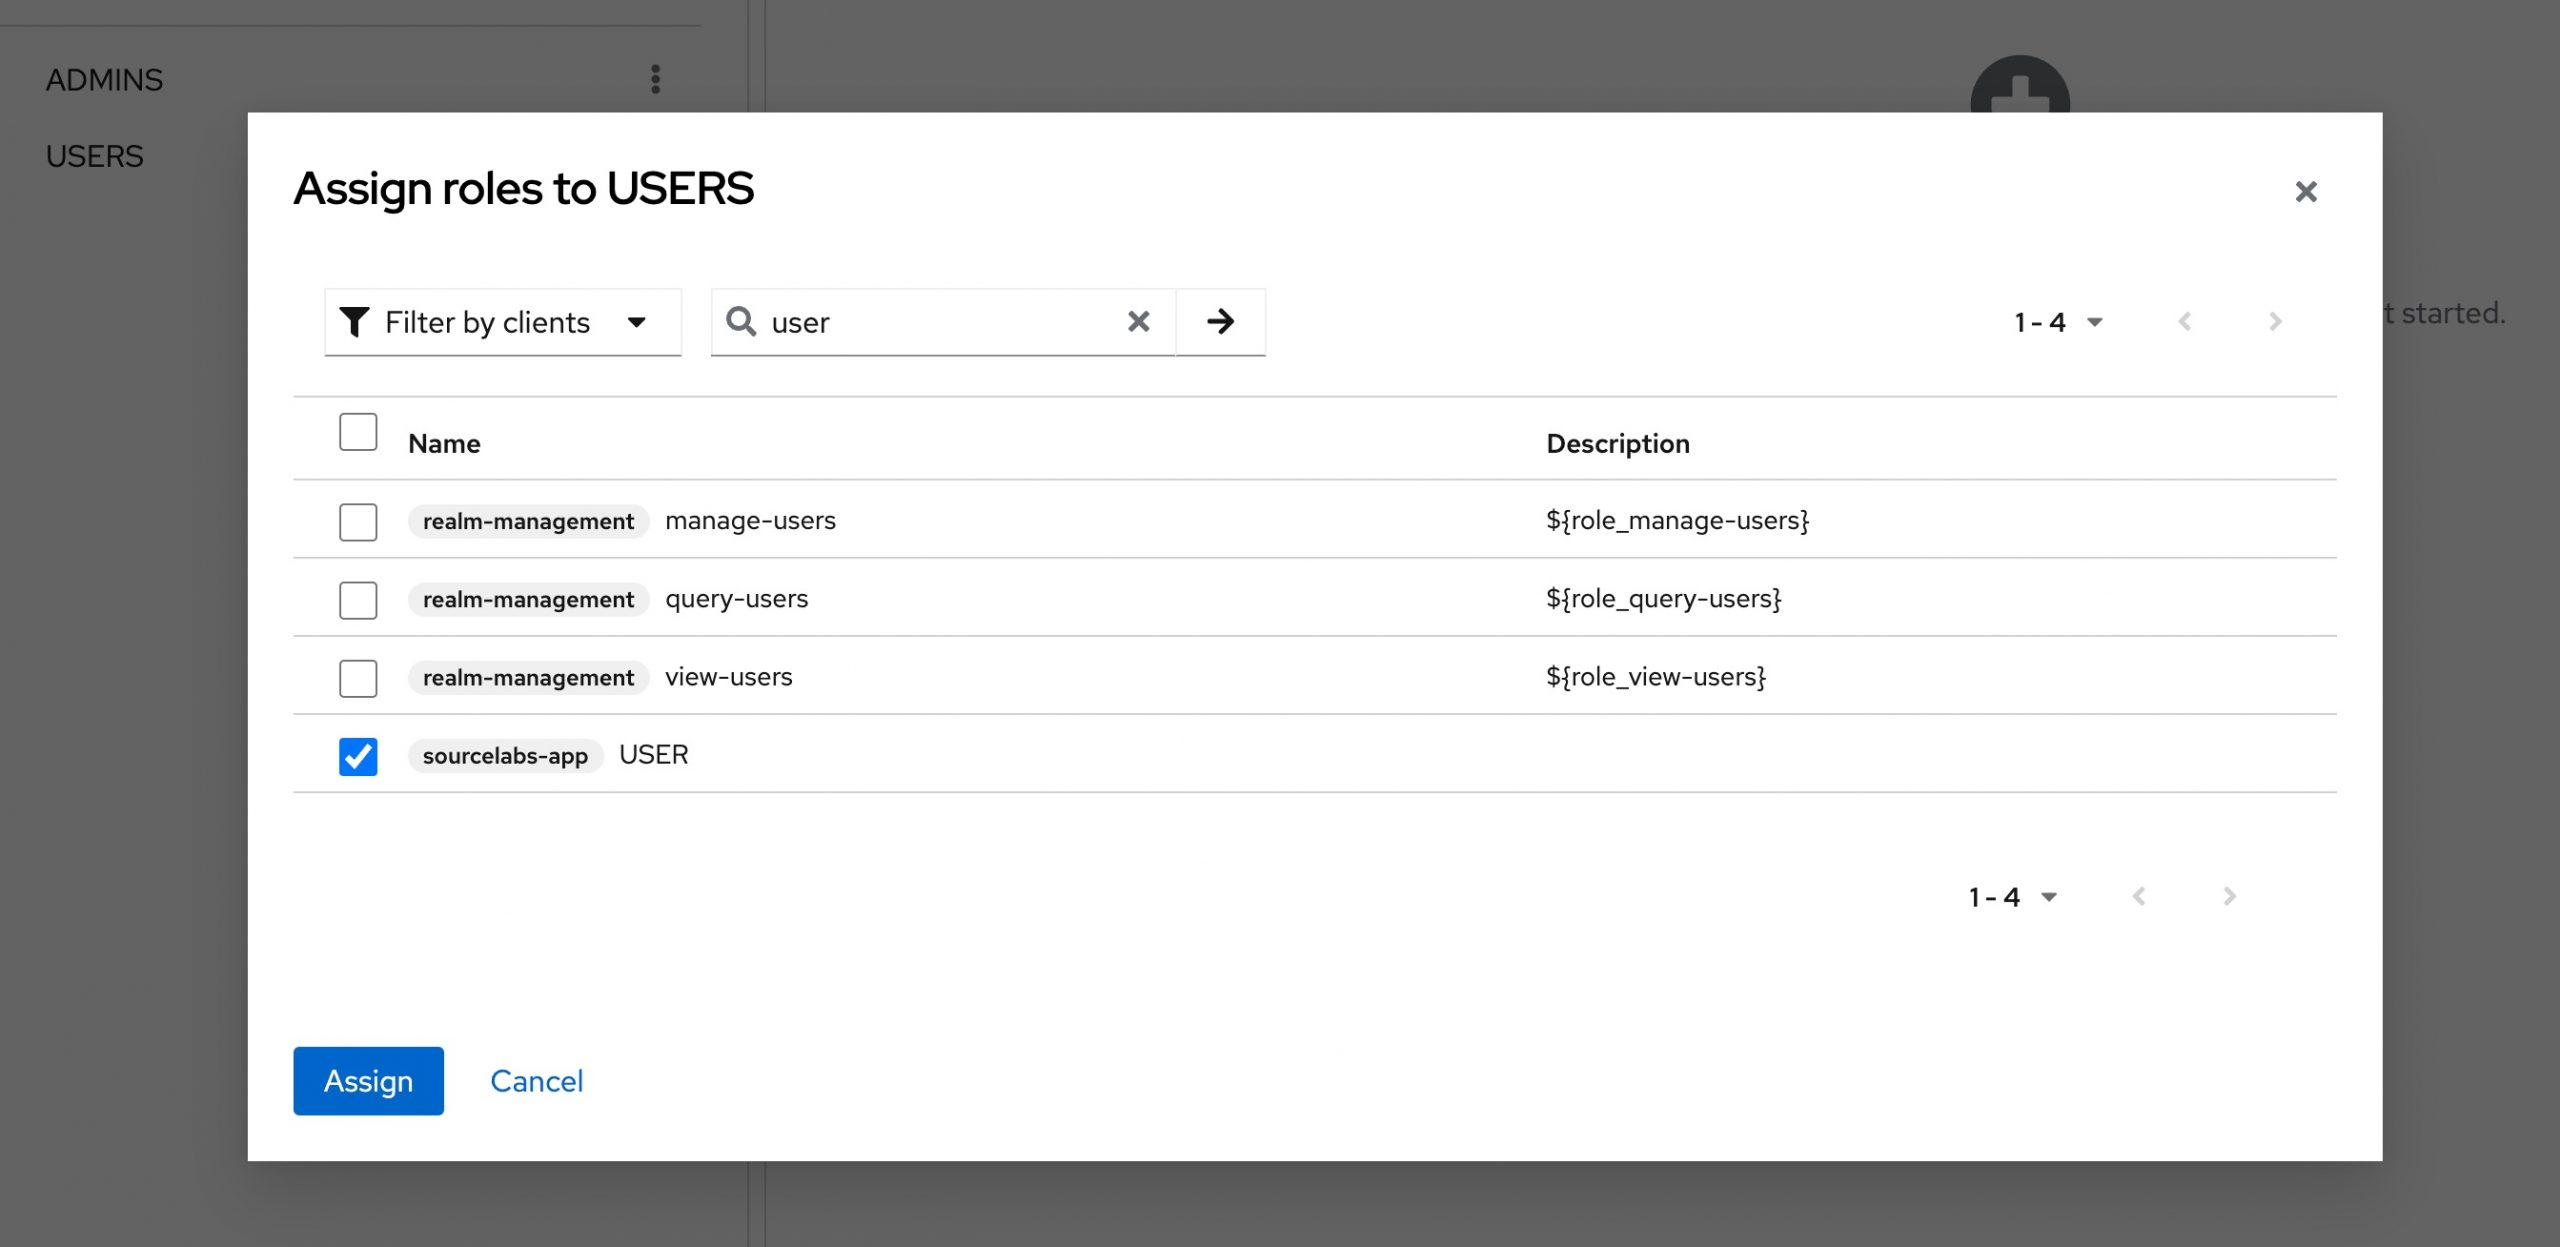
Since these are client roles, make sure you change the filter to ‘Filter by clients’ and use the search box to find the right role. Click the checkbox in front of the role and press assign to assign it. Repeat these steps for the ‘ADMINS’ group, assign ‘ADMIN’ for the admins group.
Finally, for each group find the ‘members’ tab, and add the ‘User’ and ‘Admin’ to the ‘USERS’ group, and the ‘Admin’ to the ‘ADMINS’ group. Admin users will now get all roles assigned to the groups since they are part of both. You are free to organize this however you see fit, but it does make sense to organize it in such a way that making mistakes is difficult.
Exporting the realm configuration for easy import
Now that we have the basics set up, we can export the configured realm and client configuration so we can conveniently load it in our docker image when it restarts. To do this, navigate to ‘Realm settings’, and in the view that opens, press the ‘Action’ button (top right) and select ‘Partial export’.
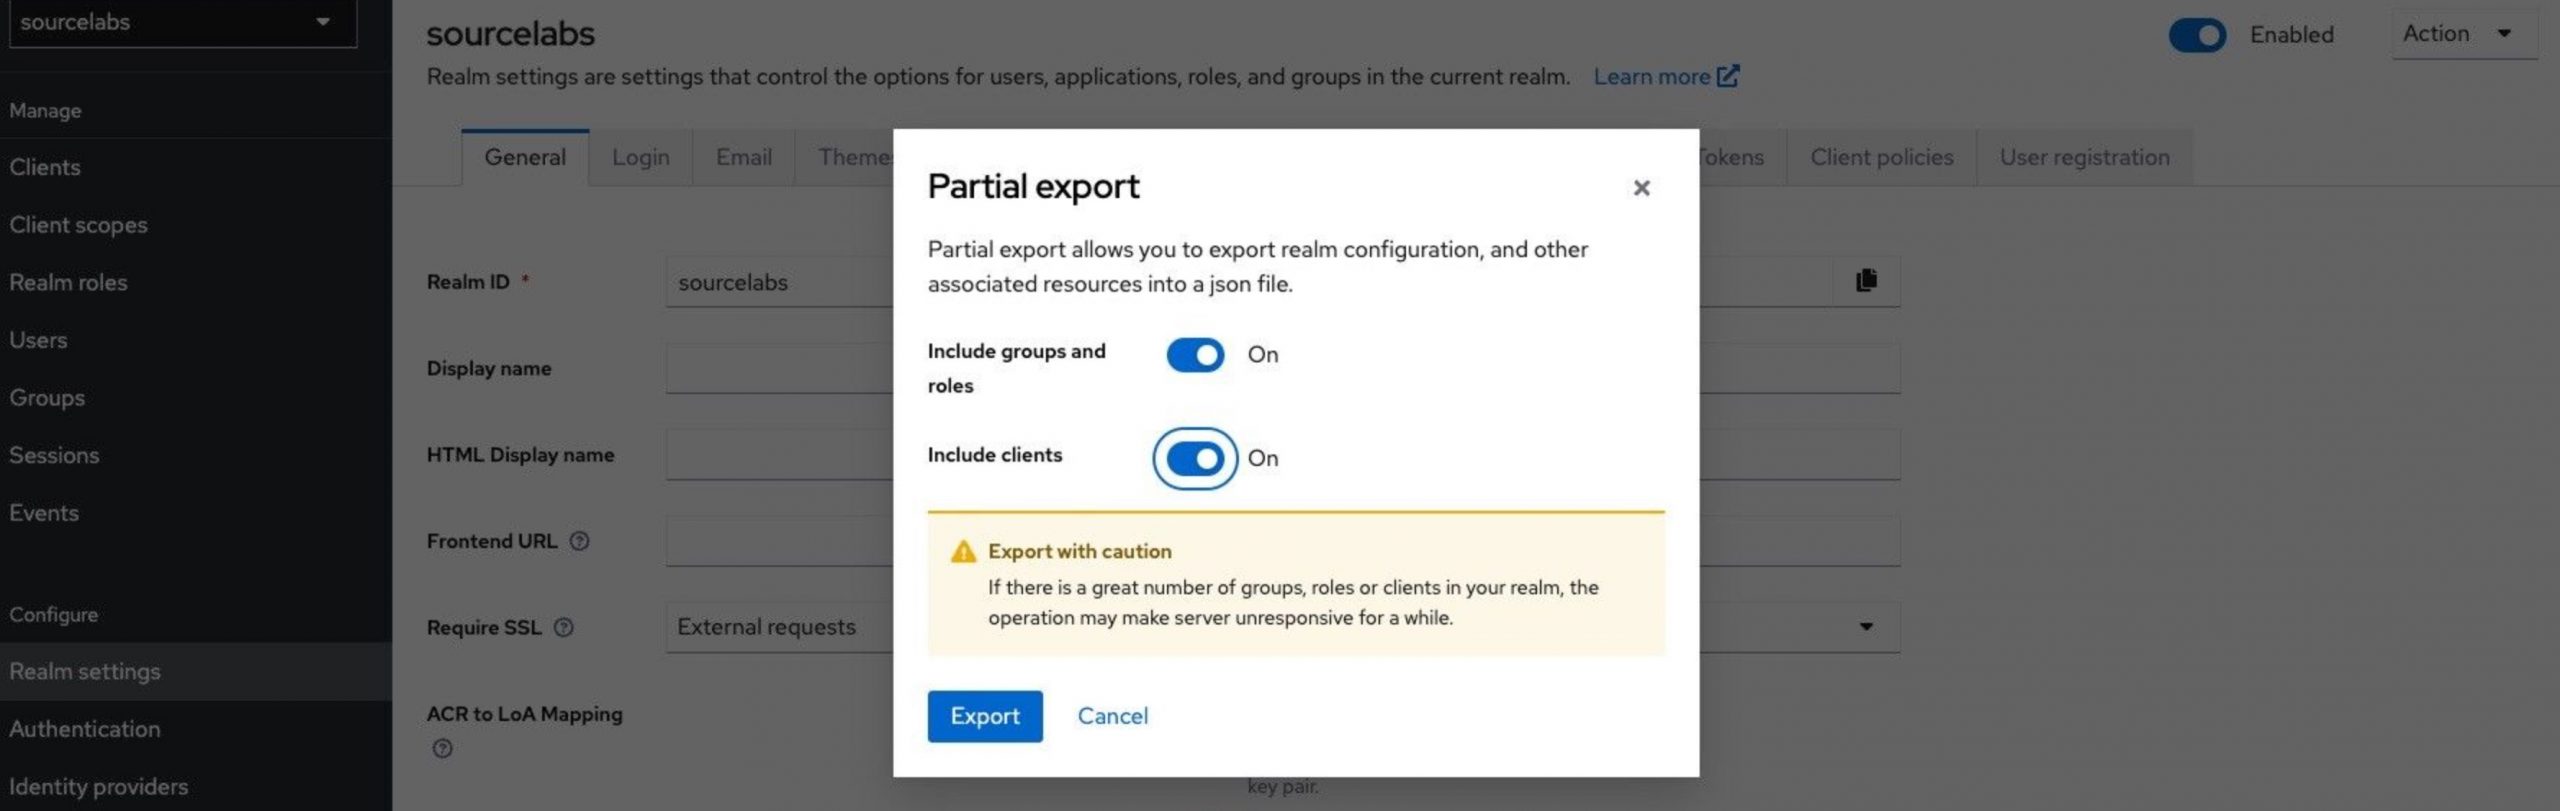
Select to include clients and groups and roles, then press export. The resulting file (realm-export.json) will be used to initialise the docker image, so we will put in in src/main/resources for use. In the testcontainers code, we make the following change to load it whenever the container starts up.
Now, when the container is restarted, we should see all the config we just added applied again. Note that there are no users (yet). You can add them through the user interface, but you can’t export them via that same user interface, which makes them disappear between restarts.
We can however add them for import in the realm-export.json we just created, so we will do this manually. In a production scenario, you can use Keycloak CLI tooling to export users if required.
In the realm-export.json we can add a last element at the back, called “users": []. Add it and use the following snippet to create an admin user and a regular user. Add the users to the configuration.
When added, we will have two users (user/user and admin/admin) that we can use for testing. Feel free to modify some of the settings, but make sure the groups elements match the created groups in Keycloak.
Conclusion
In this first post, we went over some of the details that are part of OAuth 2.0 and how to set up Keycloak. We created an exported realm so we can easily reproduce this configuration. This has two main reasons: we would like to have a reproducible context that is predictable and repeatable so we can write automated tests. Secondly, it helps to embed your server configuration in a script so you can check your (future) production environment against it to make sure both are set up correctly. Using a live container for testing is a good idea since this eliminates any surprising scenarios you may encounter on production when for instance disabling or mocking security during a test run.
Having this all set up means we can start building the application, which will be covered in the second part of this post.